PREPARING YOUR ARTWORK
Files We Accept:

We accept .PDF, .EPS, .AI, .PSD and image files (only 300dpi+ at actual print size). It is preferred if your artwork consists of vectors as it will print out more detailed, crisp and easier to edit if we must. Don't forget to create outlines for all of your fonts as well as strokes,
Pixels Vs. Vector:

This is the image I want printed onto my garments.

This is the image saved as pixels zoomed in. See here, we lose the sharpness and quality. Big no no!

This is the image saved as vector zoomed in. Vector allows you to re-size without losing any information.
Sadly this is the boring stuff, but it's important for us to tell you! When we request 'hi-res' image files, what does that even mean? It's important to understand that what you view on your computer screen or any digital device will be different to what is actually printed. To not sound too technical, pixel images (otherwise known as raster) are made up of little squares that produce jagged lines and curves. Vector images are created using mathematical formulas that produce very smooth lines and curves.
Pixel images are usually in .GIF, .JPG, .PNG and .BMP file format. We do accept pixel images however they've got to be saved at the highest quality and at 300dpi+ (standard output size) at actual print size. The size is usually found in document settings in most image editing programs. Vectors are usually worked on in Illustrator or Photoshop using the pen/brush/shape tool and are usually saved as .PDF, .EPS, .AI and .PSD files. For vector files, please ensure all your text and strokes are outlined!! Please see below. If you send us a .PSD file it's preferred that the artwork be saved as a smart object.
After all this fluff, please don't fret. Just double check with whoever made the artwork to ensure everything is print ready! Refer them to this page just to make sure! Our graphic design team will always go through your artwork to ensure the quality is good enough to be printed, so you'll be hearing from us should we encounter any problems!
Creating Outlines for Text (for Adobe Illustrator):
Creating outlines for text is extremely handy especially if you are using a font that you have found online and downloaded. If we do not have a font that you have used, the program will find a replacement font that is 'similar' which more often than not isn't even close. When the outlines have been made it is much easier for us to scale/edit your artwork without losing any information. Do this also if you have stroked your text! Alternatively, you can send the font file along with your artwork.

Select your text.
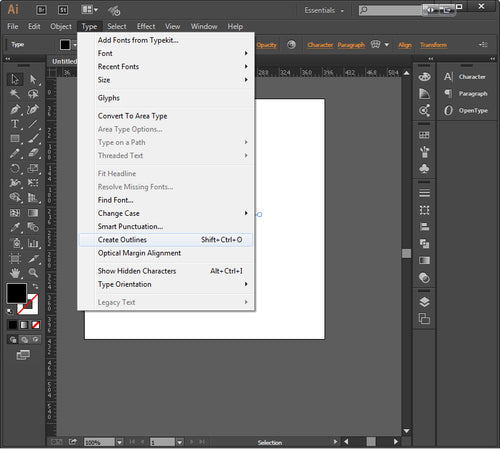
Go to Type>Create Outlines

Done!
Creating Outlines for Strokes (for Adobe Illustrator):
Creating outlines for strokes would be handy particularly if you have made an illustration out of various shapes or lines using the pen/brush tool. The width of a stroke does not scale up or down along with the artwork, so that's why it's important to create outlines.

Select your stroke.

Go to Object>Path>Outline Stroke

Done!